10 Apr 2013
by Mindfully Artistic
in 2D Tree, in process, meetings, Process, Scattered
Tags: 2D, art, art therapy, dr anne coon, dr coon, dr monica weis, dr weis, external, external influences, family, influences, internal, internal influences, knowing, medications, mental health, monica weis, photography, question, therapy, time, timeline, tree
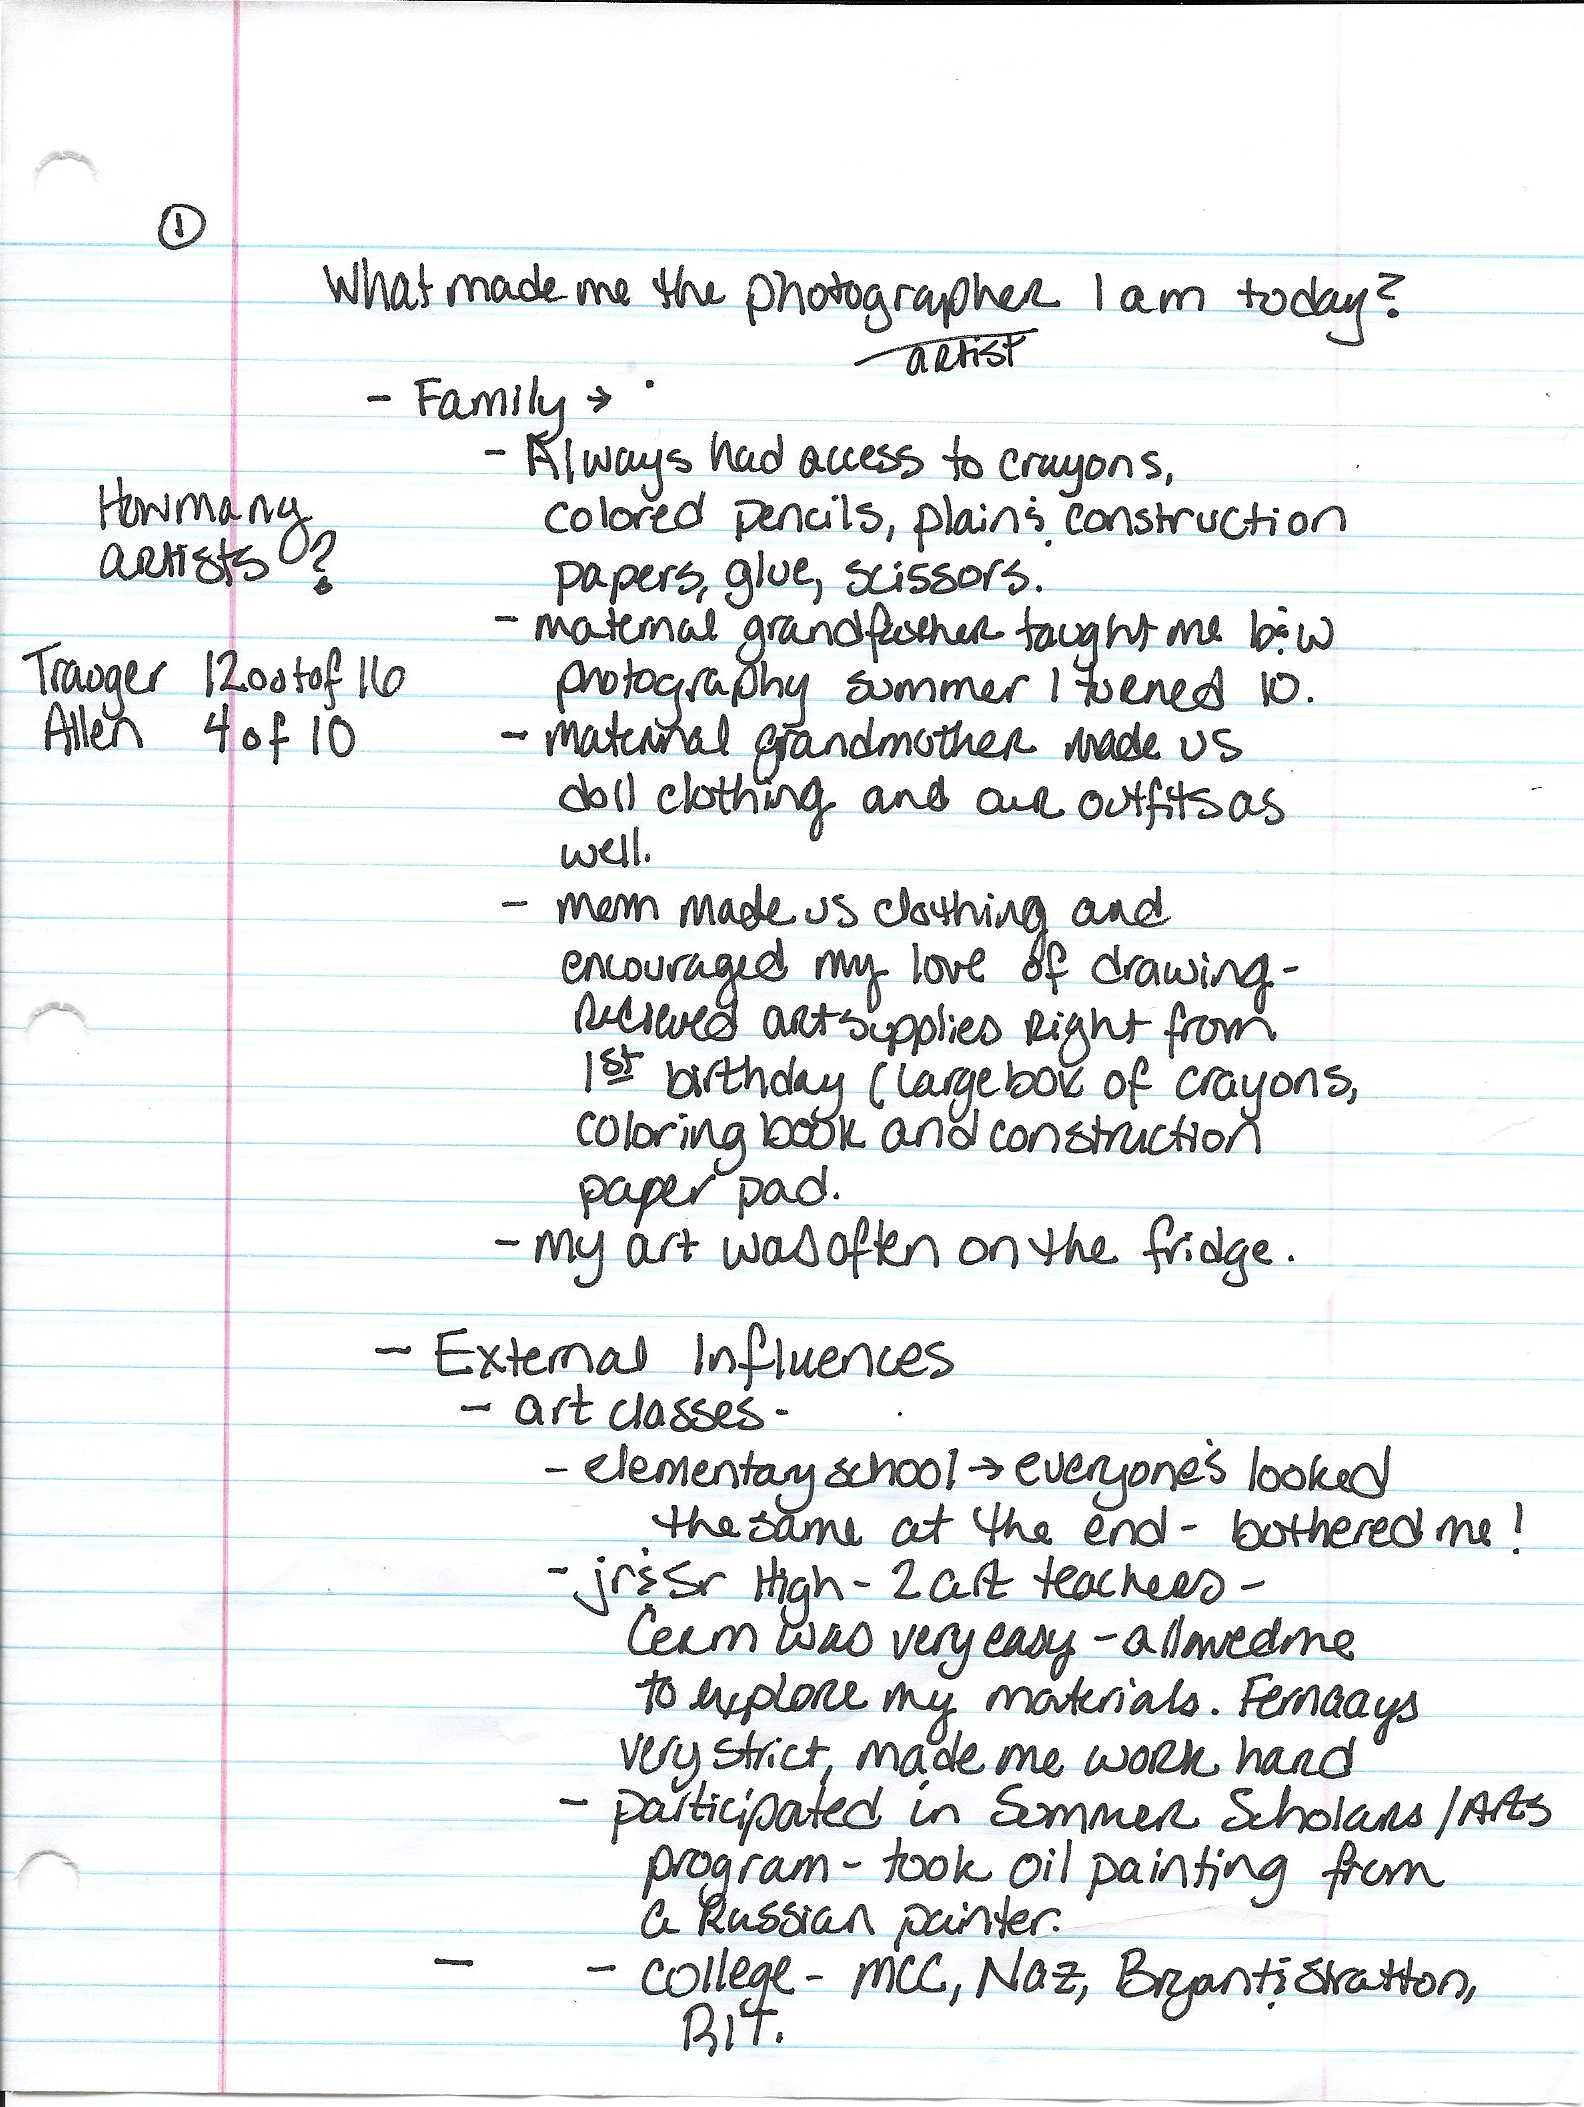
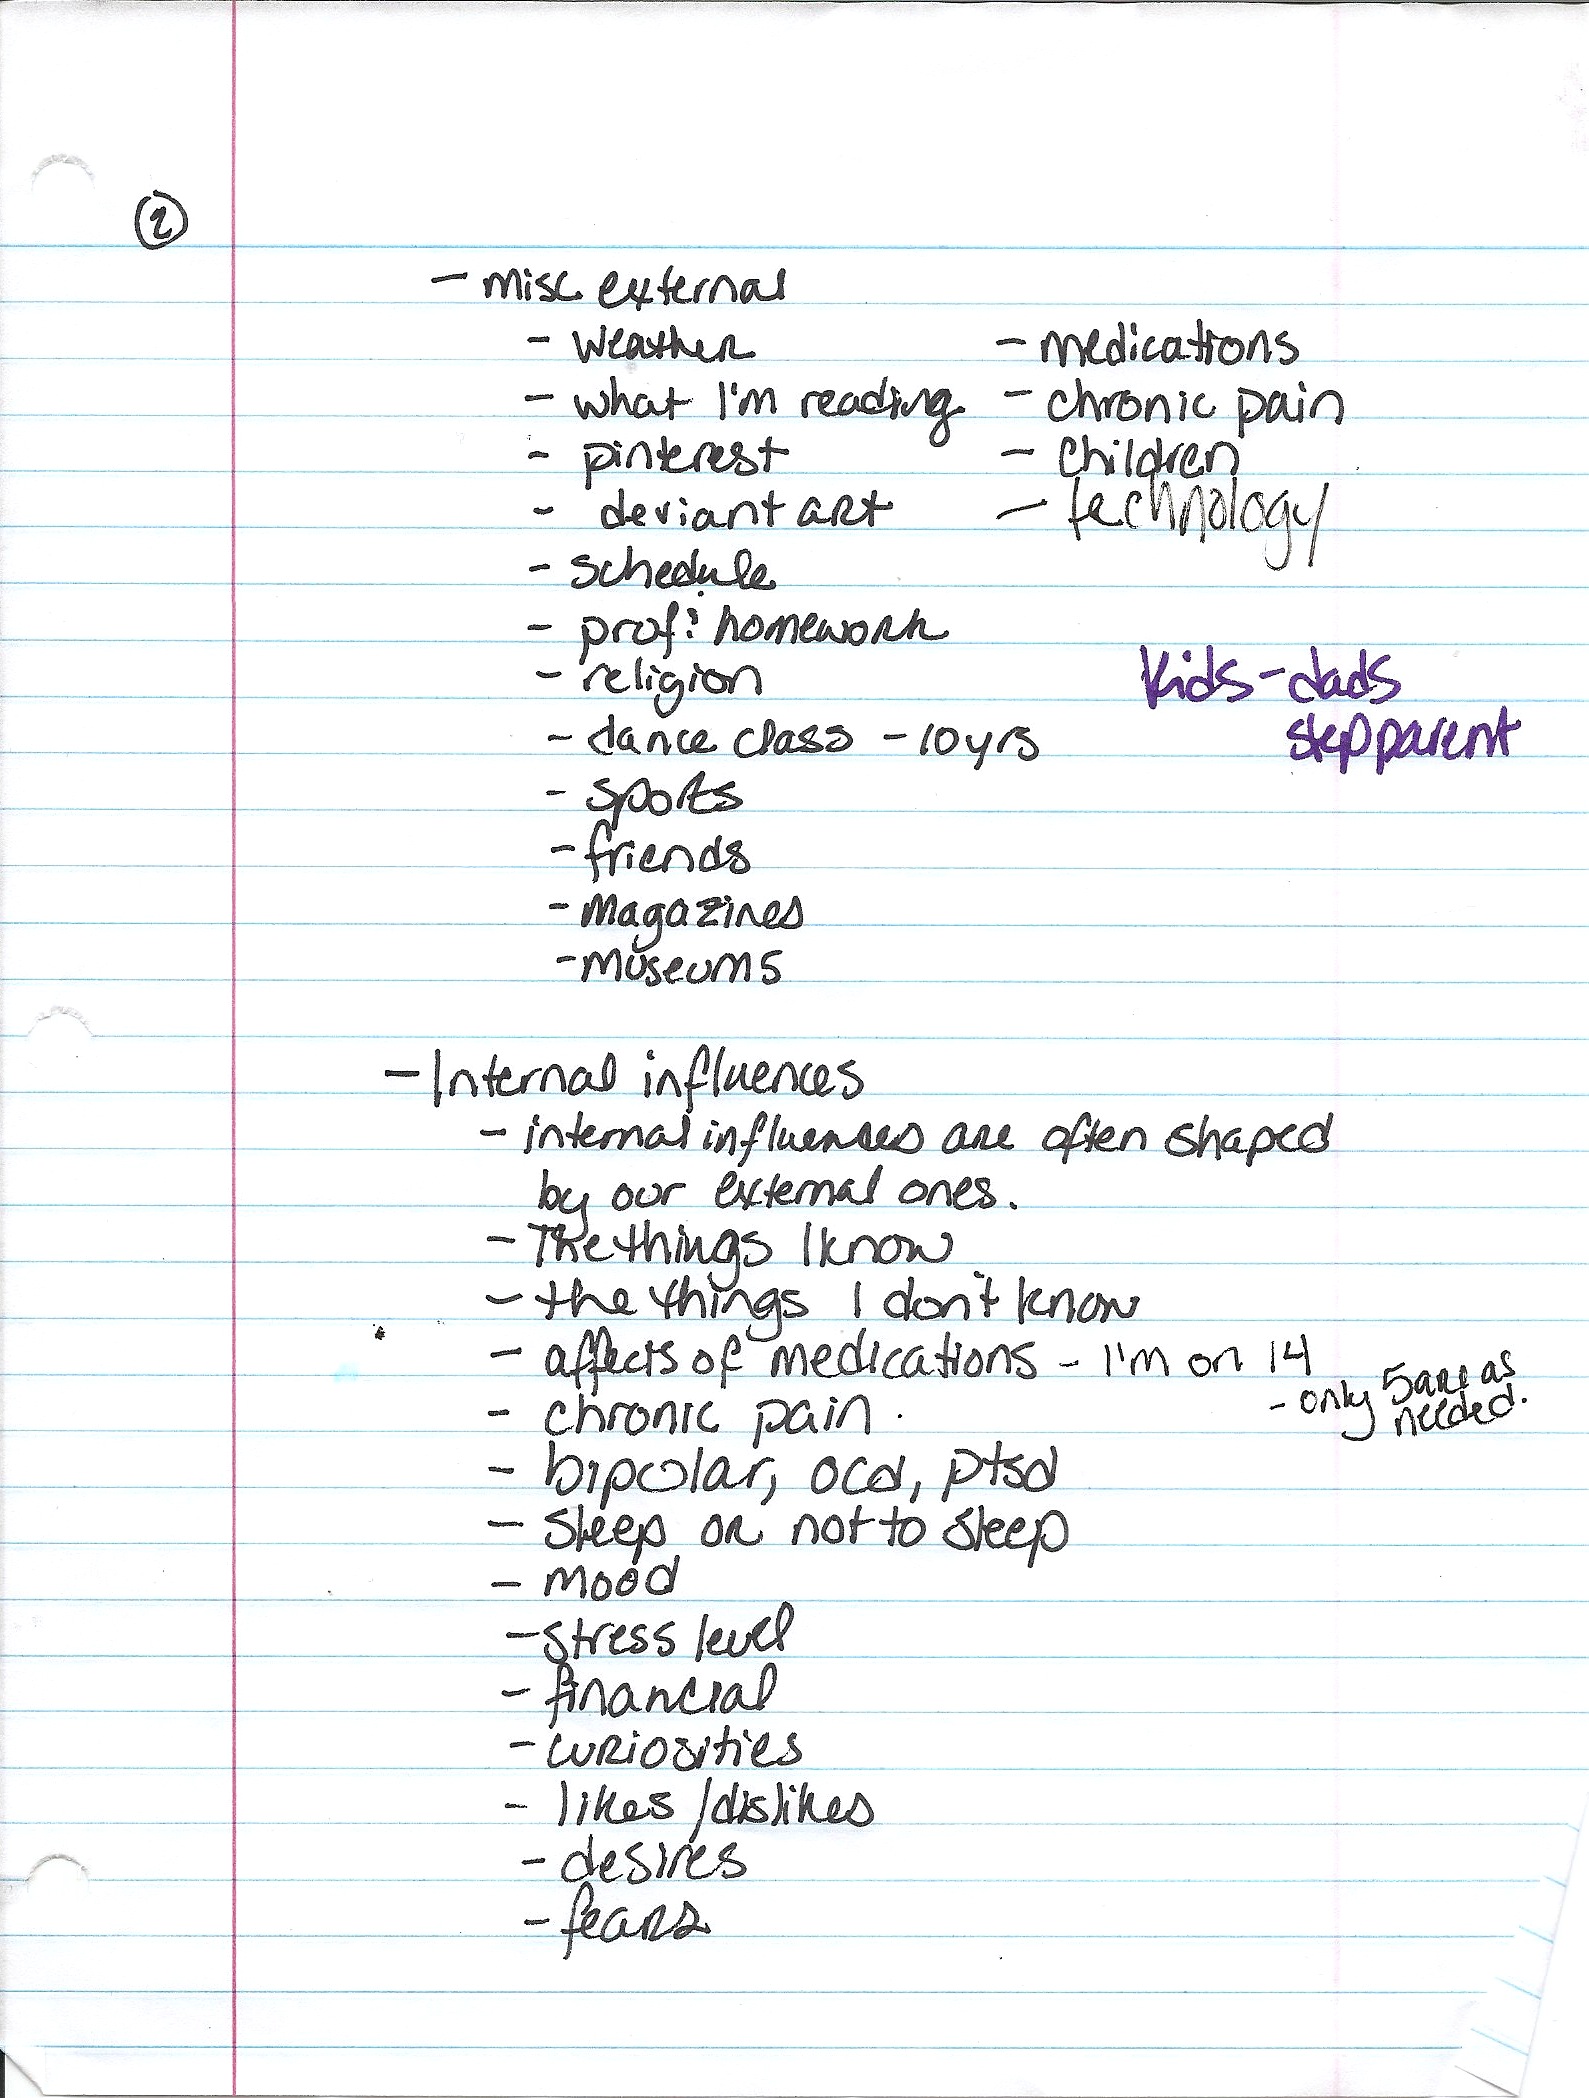
With just a few weeks left of the semester Jesse, Cathy and I had to do our first thesis presentation. Our instructions were to share something of what we were doing, and to keep it to about 10 minutes. For the few days before I tore through all the art portfolios that stored my own work work and then went through the boxes and portfolios that I had collected from my family. I needed to figure out which pieces were the most important. I kept changing ideas. I knew for any part of this, keeping it to 10 minutes would be difficult. After a few late nights’ practicing run throughs, I decided to share the internal and external influences that created an environment that lead me to become the photographer and artist that I am. Here are my written notes. I used them to help stay on track.
~~~~~~~~~
Notes: Part 1: Presentation
Notes: Part 2: Presentation
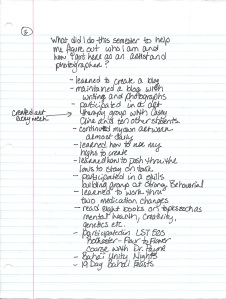
Notes: Part 3: Presentation
10 Apr 2013
by Mindfully Artistic
in Family Artwork, Resources
Tags: dad, external, external influences, glass, grandfather, grandma, grandmother, grandpa, influences, mom, ribbon, stained, stained glass, zip, zipped, zipper
In a previous post I noted a long list of items I was able to come up with for family artwork. Some of the items I did not bring with me. If I can get an installation somewhere, I will have them, but for right now, they are in my mom’s house. I took pictures of them, and have them now ready to share with you!
This first one has been hanging on the wall for as long as I can remember. My mom(Patricia) did macrame necklaces for my grandfather(her father John) as well. I always thought it was cool, and learned a bit myself when I was into making friendship bracelets as a teenager.
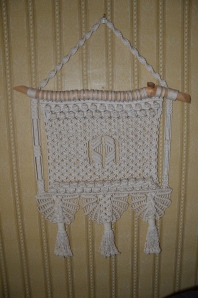
Mom’s Macrame
My mom’s family goes back to the name Fenstermacher. In direct translation it means window (fenster) and maker (macher). I believe there were actual stained glass workers in the family as well. I’ll have to get some clarity on it… Anyway, my mom took a couple stained glass classes, and has a set up to work on it at home. Here is one she did that hangs in the bay window of the living room.
Mom’s Tulips
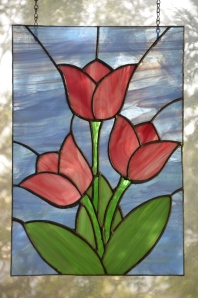
Interestingly enough, my dad’s dad(Lewis) also worked in stained glass later in his life. He created quite a few pieces, here is one that my parents have that also hangs in the bay windows. It was quite difficult to get a good picture. Where it hang, and the time of day, made reflections go all crazy, so this is the best I got without too many reflections. It reminds me of Everett, Washington, and the snow capped mountains out in the distance.

Grandpa Lewis Allen: Stained Glass
You know how sometimes something has been around for so long, that you begin to think someone else made a particular item? Or they both made similar items, so it is hard to know who did what? Well, this house has been in my mom’s craft room for just about as long as that macrame above has been on that wall. I do believe my mom’s mom (Peggy) made this house.
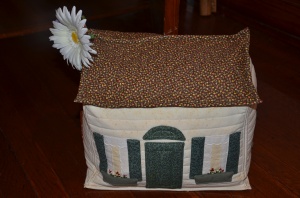
Mom’s Ribbon House: Front Door
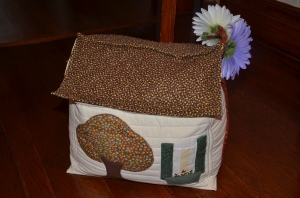
Mom’s Ribbon House: Back
The roof zips open, my mom has always kept her house full of ribbons! And, when I zipped it open for a shot, guess what! It is still full of tons of ribbon!
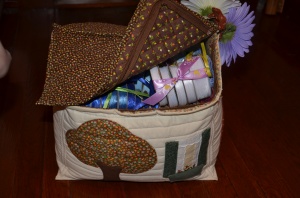
Mom’s Ribbon House: Open
I have many more I could post here, but I’ve decided this is enough for now. I’ll add more probably a few at a time over the next couple weeks, so stay tuned!
05 Apr 2013
by Mindfully Artistic
in 2D Tree, art therapy group, in process, studio
Tags: art, art therapy, blue, brown, creative, creativity, external, external influence, external influences, family, green, honesty, leaves, love, loyal, respect, slice, therapy, tree, values, water, watercolor
So in art therapy today our directive was to think about our values and the values of our families. We were supposed to create something with those, I think perhaps also how they help us, though not positive on that part… It was interesting to see what everyone did. Another girl and I both did trees, very different from each other, but trees none the less.
As soon as I heard the directive, I was excited because it meant I could add more to my family tree theme… I didn’t take pictures all the way through, I wish I had! And then, I attempted to use salt on the water color, and it didn’t work like I had hoped. I’ve never done that combination, but have seen it, and loved it. I hope to be able to learn it soon. I have read in several blogs, and pins on my pinterest account that it takes the right timing of applying salt as well as the correct saturation of water on the page… I’m guessing this will be like when I learned out to drive standard… all at once, something will *click* and I’ll get it… let’s hope it doesn’t take as long as the driving thing did! *lol*
Anyway, here are the pictures I did take to share with all of you!
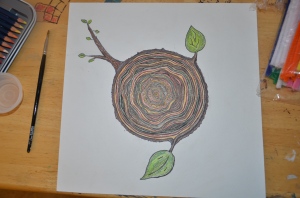
Family Values: Inked & Watercolor Pencils
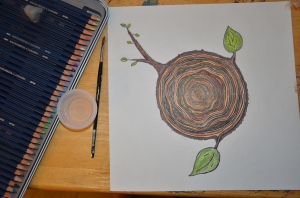
Family Values: Inked & Watercolor Pencils w. Water
Family Values w. Background
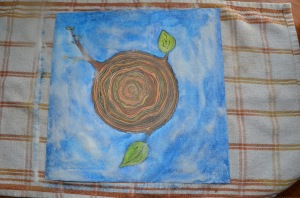
Family Values: With Salt

Family Value: Finished
Like I said above, I’m not really seeing the salt effects at all… could have been any number of things however, so I’ll be giving it much more practice in the weeks and months to come!
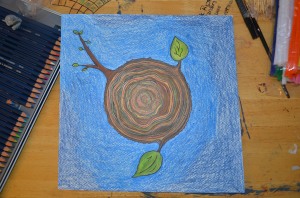
Oh, and I didn’t say above, but those values are within the inner rings of the tree… family values can keep families strong. The strongest part of a tree is its core. The values I listed include: loyal, respect, passion, creativity, reliable, positive, love, honesty, truthfulness… and love again… I could have done so many more…
01 Apr 2013
by Mindfully Artistic
in 3D Tree, in process, Process, studio
Tags: 3D, blue, bright, color, colors, dahlia, dahlias, external, external influences, flower, green, influences, internal, internal influences, orange, paper, poof, purple, red, tissue, tissue paper, tree, two-tone, vibrant, violet, yellow
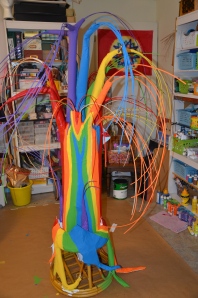
Today came another layer of paint on the 3D tree. I am very pleased with how it is coming out!
Robyn and I went out tonight in search of tissue paper in vibrant colors. First we went to our neighborhood Dollar Tree where we purchased four multicolor packs that gave me 25 sheets(per package, 100 sheets total) including red, blue, lime green and yellow (and pale pink, which I’ll save for present wrapping!). This was a great start for $4.28! BUT, I still needed purple and orange!
We decided to run over to Michael’s Arts and Crafts, to see if they had any. The best part is that I still have a gift card for them with just over $40 on it! And, I had a coupon on my phone. (I think this is the best idea- I always forget my coupons, or they expire- and now I can just check my Michael’s App or my Joanne’s App to see what coupons I can use!).
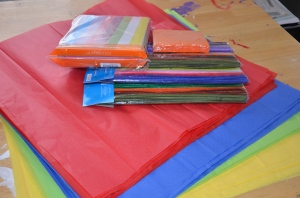
Materials for Flowers
We found multipacks (you can see it in the top of the bottom image) that had more colors than I needed, but was the only way I was finding purple and orange. The pack had 100 sheets with 10 colors of each. I ended up being very excited to have the pack though it wasn’t cheap ($7.99 – 40% off coupon). The flowers were planned to be two-tone, so those other colors came in handy!
The pipe cleaners were also from Michael’s. I bought 3 packs($2.99) hoping I would only need two! And, I also grabbed a pack of orange party napkins, in case I didn’t think the orange was bright enough.
Michelle Dupuis’s tutorial on making tissue papers was fantastic! She posted just over a year ago about making these. I love that she came up with five different flower types. Since I chose to do all of mine as Dahlias, I had fun mixing up the colors a bit. Michelle used 10″ squares. I decided I wanted mine smaller, to be proportional with the tree. Now, don’t ask how I figured that out, because I don’t know. In any event, I decided 6″ squares would be good. Thankfully the squares do not have to be perfect! Here they are all cut out, with some of the pipe cleaners I planned to use:
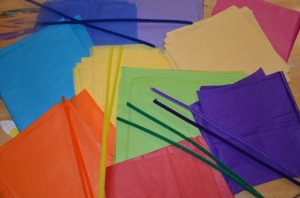
Tissue Squares
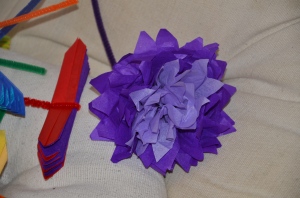
Here is how they came out! The bottom is folded like a fan, with the ‘center’ color on top, held tight by a purple pipe cleaner. The top is the sheets each pulled out to give the puffiness! Here is another view:
Two-Tone Purple
Initially I knew I needed 35 flowers. They would be the ones I needed having art mediums “blooming” from them. While I was making them I decided that no, every reed stem off the tree needed a flower! So, all in all, I think I created 90-95. Here is the pile:
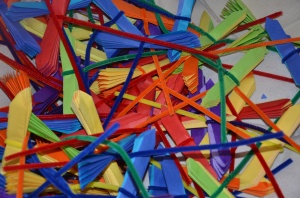
80+ Tissue Paper Flowers!
For right now, they are staying folded up. Once the stool is done being painted and I have my art medium items created, I’ll start “poofing them out.” Here is another view:
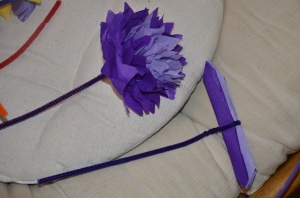
Purple Dahlia Flower
29 Mar 2013
by Mindfully Artistic
in 3D Tree, in process, Process, studio
Tags: 3D, acrylic, acrylic paint, acrylics, blue, external influences, family, family influences, green, influences, orange, purple, rainbow, red, tertiary, tree, violet, yellow
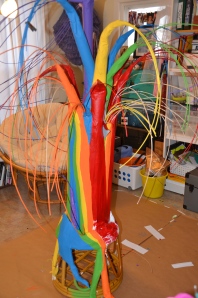
This tree has literally taken over my studio. Thankfully we have a table for just the laptops and homework, and whatnot! I have brown craft paper taped to the floor, paints in the cups so I can recycle them when done, and paint brushes galore. I forgot to take a picture the first night I was painting. I had painted purple and blue. As the days have come along, some of the colors have shifted in an effort to keep the natural flow of a growing tree, but also to create more of a balance with the colors. When I first started the color process I honestly had no idea how the tree would be exactly… I had a pretty good idea, but I knew it would figure itself out as I went through the process.
In Process-3D Color
I decided to start the tree while it was on its base so I could work out the color flow. Red insistently was the overwhelming color.
3D- Different Angle
Base Paint
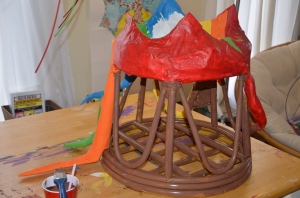
Once I did a couple coats of the tertiary colors, I tackled the ‘dirt’ section which, you may recall is an upside-down papasan chair foot stool. We had bought the papasan in Washington State at a Goodwill Store. My son Rook and I are the only two who use the chair, and neither of us use the stool, we put our feet on a giant blue yoga ball… or we don’t use anything at all for our feet. In the image above I mixed five or six of my 2oz paints again to get the brown. With the light would underneath, it is having a variant all its own. Some parts were shiny and needed to be gone over a couple times. I’ll be doing one more coat to make sure I have it all before I weave in some papers and colored pipe cleaners.
I am working on what types of tissue paper flowers I want to have blooming from the tree. I found this cute Dahlia tissue paper flower while on pinterest, that I think I will use. I’ll link to it if I do decide to use it!
26 Mar 2013
by Mindfully Artistic
in 3D Tree, in process, Process, studio
Tags: 3D, acrylic, acrylic paint, external, external influences, family, interview, question, questions, tree
I have received back a couple of the family interviews. My grandmother, mother and father have sent me theirs. Mom printed hers out, and hand wrote her responses to each of the questions. Grandma and Dad’s are typed. I had thought the week before I’d received someone else’s, however it was a letter letting me know they would get to it, and send it along. There is one member I would love to hear from, so I can’t wait to see if it happens!
As I’m waiting for these to come in, I’m continuing to work on painting the 3D tree. It is finally looking like a tree!
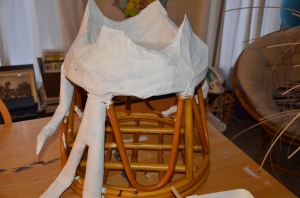
Tree base with basic white paint.
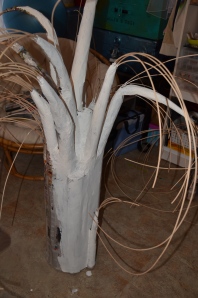
Tree trunk/limbs painted white.
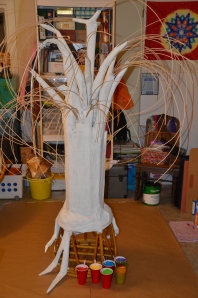
All Three Parts with paints lined up.
25 Mar 2013
by Mindfully Artistic
in 3D Tree, in process, Process, studio
Tags: 3D, acrylic, acrylic paint, acrylics, art, batter, blue, cake, cupcake, cupcakes, edible, external, external influences, green, orange, paint, purple, rainbow, red, violet, yellow
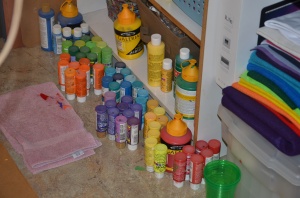
When deciding how to paint this 3D tree, I decided immediately that it would be abstract and that the colors needed to be bright and cheery and as abstract as the tree would look when done. I chose to use the tertiary colors, which are the six rainbow colors: red, orange, yellow, green, blue, and violet. I also knew that I didn’t have a lot of extra money floating around for buying new paints, which is why, if you have been following along, I decided to use up some of the 2oz bottles of acrylic paints. This worked out amazingly well. I cleaned out paints AND put them to good use! I really enjoyed mixing them, and seeing how they intermingled together in the cup. Here are some photos:
Divided By Color
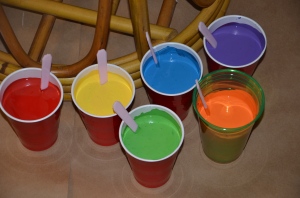
Mmmm Yummy Paint Cups
Okay, seriously, I didn’t taste the paints! But for whatever reason, they are so pretty, and look like they could be the rainbow cake batter I made for this awesome rainbow cake last summer. In fact, here I’ll show you the batter:
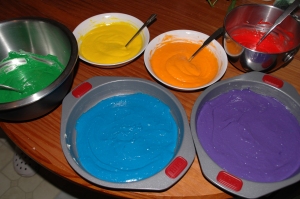
6 Bowls Of Cake Mix
See what I mean? Brilliant colors! I love these!! And, here is that brilliant cake baked:
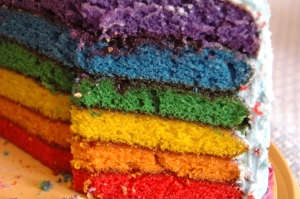
Close Up Of Rainbow
The rainbow cake was a huge success! I think my tree will be too! I’ll share more as I paint!
21 Mar 2013
by Mindfully Artistic
in Completed Projects, meetings, studio
Tags: 9, 9-pointed, art, Bahai, center, children, external, external influences, Mariah, nine, nine-pointed, pointed, poster, star, time
Mariah had emailed me several months ago about our creating a poster together for a window box outside The Baha’i Center in Rochester NY. I had gone into several activities including children’s classes, study circles, luncheons, Unity night as well as others. We wanted an array of people, all shapes, sizes, color, young, old. We wanted them all! We finally were able to get together yesterday to put it together.
She came in the afternoon. I had set up a few basic things, but was going to play it all by ear. I really was interested in her ideas, and me being able to make them happen. Mariah had stopped in to see her husband at lunch time, and they talked about what might be good to bring people into the walkway to read the sign. With this information, the images, the bright paper, quotes, we started creating what we thought would be good for the poster.
At first everything was literally all over the page- jumbled if you will. It didn’t have a flow to it, and quite possibly, you’d miss a lot more than what you saw. So, we changed the approach, and laid out all the words linear to each other, and then added in images that we felt some how corresponded to the words.
It was a neat activity, and Mariah was fun to work with. Here is what we came up with:
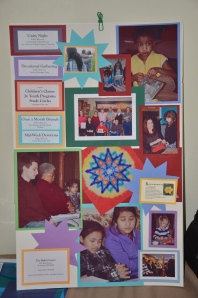
Baha’i Poster
20 Mar 2013
by Mindfully Artistic
in homework, meetings, Process
Tags: calendar, class, dr monica weis, dr weis, external, external influences, health, influences, information, internal, internal influences, monica weis, question, timeline
Tonight we had our thesis meeting. I was armed with a list to take with me up to the podium. Those things by themselves scare me! BUT I tried to remember that Jesse, Cathy and Monica (Barbara couldn’t be there) were there for my support, willing me on! So, the assignment was to share a list of thesis “jobs” we had completed or had nearly completed, and a list of “jobs” we still had left to do. Monica said to think about, “breaking this enormous project into workable chunks and share” with the others. Jesse who brought his adorable 6-month old, with him went first. I went after Jesse, and after me was Cathy. Here is what I came up with:
Completed: Paper mache tree; sent out interview questions; read 2 books and completed 1 annotated bibliography; attend art therapy each week and produce one piece of new artwork.
Nearly Completed: mixing paints for 3D tree; collection of collage stuff for the 2D tree; follow-up phone calls;
Still To Do: Continue blogging; continue reading books; go to mom’s to collect my old artwork, grandpa’s photos, grandpa’s coffee table, pictures and etc; paint 3D tree, create 2D and finish.
I also must figure out a few other things, but these are the ones I shared in class. Time is clocking down fast. Very fast….
19 Mar 2013
by Mindfully Artistic
in 3D Tree, Family Artwork, in process, studio
Tags: 3D, acrylic, acrylic paint, altered, altered book, blue, collage, drawing, external influences, family, fibers, green, influences, jewelry, oil paint, orange, paint, photography, purple, red, rubber stamp, sewer, tree, wood, woodwork, woodworking, yellow
With the production of my 3D tree nearing the end, and painting have started, and on its way to nearly done, I felt I should be giving some serious considerations to what my hanging items would be. They are listed like this: {Medium (item to hang) #needed}
Acrylic Paint (Paint Palette) 3
Altered Arts/Altered Books (A Mini-Handmade Altered Book) 2
Collage (Mini Sheet Collaged Front and Back) 3
Drawing/Pen &Ink (Drawing Pad/Pen) 5
Fibers (Small Bolt of Fancy Yarns or Fabric on a Hoop? ) 6
Jewelry (Tiny Beaded Bracelets) 4
Oil Painting (Paint Palette) 3
Photography (Polaroid Film Sheet) 3
Rubber Stamps (Rubber Stamps) 6
Sewers (Fabrics/Needle) 5
Woodworking (Chisel) 3
These mumbers are based on how many partake in that particular art medium. Some members of the family are fairly prolific and use a wide variety of arts. An example of this is my Aunt Barbie who as an Art Therapist must have a variety of talents to work with her clients. Some of them draw, some collage, some color… it all depends on their capabilities and what they may be interested in. There are vast overlaps, as these are based on 13 family members.
Previous Older Entries